Thursday, August 25, 2011

Saying Goodbye to More Than Stains

Hard-working spaces like laundry rooms can quickly become eyesores best solved with closed doors.

That certainly was the case in my house.  

With the laundry room located at the top of the stairs, detergent bottles and towels were visible every time I passed by.


After 12 months of closing the door, I finally decided to tackle the problem. 

I started by removing the existing wire shelving.  Rather than throwing it away, we repurposed the shelving by hanging it in the garage.  


The next step was to purchase new wood cabinets with doors.  I priced several options at home improvement and salvage stores.  I ended up selecting an unfinished, solid wood set at Knox Rail Salvage for a total cost of about $150.


I removed the hardware, lightly sanded the exterior and painted the new cabinets with high-gloss white paint.  It took several coats to cover the wood, and in hindsight, I would suggest buying pre-finished cabinets at Lowe's, even though you'll end up paying a little more.  The process took several hours.


Once the paint was dry and I remounted the doors, it was time to hang the new cabinets.  In true do-it-yourself fashion, we came up with our own way of getting them set in place and level.


Sometimes the best lesson in home improvement is to improvise! It's a miracle, but they actually hang straight!


While it's still a small space with little room to iron, it's no longer an eyesore.  Even laundry rooms can be transformed with a little organization.

I hope you are inspired to tackle a similar situation at your house!   

Wednesday, June 8, 2011

Carriage Doors on a Cottage Budget

Everyone knows carriage doors are a hot trend with high-end homes.  But what most people don't realize is standard doors can be upgraded to stable doors in a day, and for less than the cost of a riding lesson.

Carriage doors typically have windows, hinges and handles that resemble stable doors on southern horse plantations.  

The character and curb appeal of carriage doors will set your house apart from others on the street.  And can be achieved for less than $50.  

Home improvement stores, online retailers and eBay all sell lightweight metal handles and hinges, and a quart of black paint can mimic windows.  I ordered mine on eBay and paid about $30 for two sets.  

I have used this trick on two houses now, and neighbors always beg me to convert their doors, too.

Here's what you need to do:
  • Clean your door/s and consider a fresh coat of paint.  
  • Order your carriage door kit and buy a quart of high-gloss, exterior paint in midnight black.
  • Purchase a tube of Liquid Nails and a caulk gun. 
  • You'll also need masking tape, a measuring tape and a small, foam roller with a tray.  
  • Tape the top section of squares across your door/s in a window pane pattern.  See below:


    • If you repainted your entire door before starting, paint overtop of the tape to create a seal.  If not, you'll need to use a clear paint to form the barrier.  This step is necessary to avoid bleeding under the tape.  You'll be disappointed with the final result if you skip this step!
    • Use a small, foam roller to apply the black paint to the top squares.  Paint one coat, let it dry and reapply for best results.   

    Now move on to the hinges and handles and follow these steps:
    • Use your tape to place the hinges and handles.  Make sure you measure and mark the placement.  Once glued, they won't come off!  
    • When you're certain you've got them in the right place, use Liquid Nails to create a permanent bond.  
    • Use more tape to hold them in place until the glue is dry.  

    Want to see the final product?


    Ready to run to the store?  

    I really love the way the addition enhances our house.  I think it actually balances the facade and tones down the bright white door.  

    This trick is so easy and inexpensive and can have a big impact on your home. 

    I hope you're inspired!


    Sunday, March 27, 2011

    Painting with a Plan

    I have painted my fair share of rooms over the years - some two and three times each.  Paint is one of the best ways to make a change when you are short on change.

    The very first thing we did after closing on our new house last spring was to paint.  But for the first time, I painted with a plan.

    We frequent Charleston, South Carolina, and I bought a colorful print from a local artist on one of our last visits.  I loved the colors so much that I decided to decorate our new house using the print as my inspiration, a little tip I learned from Candice Olson of Divine Design.  Here's my inspiration:

    Jen Bennett, imagescharleston.com
    I started with a paint color, Wythe Blue from Benjamin Moore.  While my sample was Benjamin Moore, I took the color code to Lowes and was able to have the color duplicated for a lower price.  Little known tip.

    We painted for three days straight with the help of both our dads.


    We have two-story ceilings in both our entry and family room spaces.  Local painters quoted us upwards of $1,000 in labor alone!  Needless to say, they did not get our business.  My one recommendation to anyone undertaking 18 foot ceilings is to rent scaffolding.  We used a series of ladders rigged together, and it was not a good, or safe, route.  Spend the money on sturdy scaffolding!  We did use the brown painter's paper from Lowes to cover our hardwood floors.  I also recommend that safeguard.  
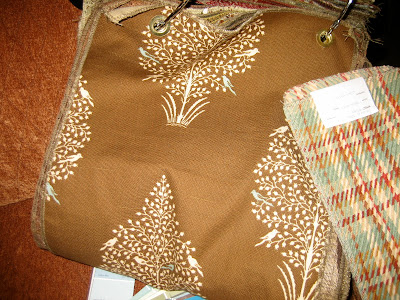
    As for furniture, fabric and wall-coverings, I worked with a designer at O.P. Jenkins, to select a scheme based on my inspiration print and wall color.  This is when things really started to come together:


    We picked a beautiful couch and two chairs to go with the plaid pillow fabric and silk drapes:


    Same Moore "Tyler" chair ordered in pure cream
    After waiting the standard four to six weeks for the pieces to arrive, we were beyond thrilled with our selections once they were delivered.  I cannot express enough how beneficial the planning process of starting with an inspirational piece was for me.  I often get overwhelmed when shopping and end up buying based on price, pattern or color alone rather than keeping the big picture in mind.

    So for the before and after unveil, here you go:

    Before
     (With the previous owners' furniture)

    After


    I hope you like it!  We're pretty pleased and really enjoy the new color palette.  Now get to painting!

    Wednesday, March 23, 2011

    Master Disaster

    Everyone who knows me knows about my issues with cleanliness.  Heaven forbid you ever have to travel to a hotel with me!

    My master bathroom is a source of constant disgust.  We've been in our new house for almost a year, and I still bathe in the dark because I'm afraid to look too closely at the shower.  I've cleaned and cleaned but still feel the previous owners' germs lurking in the crevices.  I hate framed shower doors!

    The same goes for the baseboards - how does hair get stuck to the floor like that?  

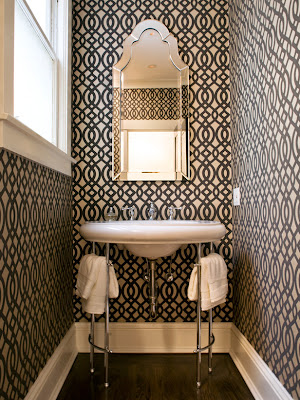
    I'm debating color schemes, tile options and of course shower doors.  We plan to tackle this project in May, and I've found some sources of inspiration.

    Here's what we're working with:


    The bones are great, and I plan to keep most elements.  I want to remove the vinyl flooring and add ceramic or porcelain tile.  I want to replace the tile around the jacuzzi tub to correspond and am contemplating accent features.  If the budget will allow, I want to add granite to the vanity top, but I think I'll keep the hardware.  Then for the shower, I really want a tiled walk-in.  I also want to expand it a tad since we have room.  

    Now, here are some options for inspiration:

    (I love this color scheme!)

    (I really like the idea of adding the small tiles behind the mirrors. )


    (I'm also obsessed with sheen and sparkle!)

    (I'm really considering this route for the face of the tub.  It adds another texture and is more affordable than tile.)
    (This is the shower at the Hyatt Escalla Lodge in Park City.  We recently visited and the shower door is exactly what i want.  They even used tile for the baseboards! Genius!)


    Thoughts?  We're saving up now, and I look forward to walking you through each step when we get started in May.  I'll explain how to demo your old floor, select your furnishings, install tile and remove and reuse fixtures.  I've not installed a tile shower before, but we can learn together!  

    Wish us luck!

    Light the Way - Decorating with Paper Lanterns

    I have a true obsession with paper lanterns and find a way to incorporate them in every party I host.  Lately, those have been baby showers.

    Since the stork is visiting everyone I know, I've invested in a collection of all sizes and colors.  Paper lanterns add visual interest, texture and punches of color.  I've taken to hanging them from the ceiling in my dining room, setting them on tables as center pieces and attaching them to my patio umbrella.

    I found a great website for ordering, http://www.paperlanternstore.com/.  This site offers every color imaginable and various sizes - all for less than $3.

    See what you think:


    As you can see, i used white tacks and clear fishing line to hang them from the ceiling.  I added ribbon to some and also hung copies of the invitation in the mix to pull the color scheme together.  They're always a hit, and again, are so cheap!  I'll never waste money on balloons again.  

    In case you're interested, here's a few more pictures of other baby shower decorating ideas:


    Small Spaces Destined for Design

    My husband and I recently moved into a new home and have spent the past few months adding our touches here and there.  Well, his touches have been confined to the garage, and frankly it's a disaster.

    In thinking about the project list, two small spaces come to mind first - the laundry and master closet.  Both are complete messes but have great potential.

    See what you think:


    See, I told you they were a mess.  But with a little time and money, I think I can make them amazing.  Take a look at my inspiration:


    I will keep you posted on my progress.  Wish me luck!

    Tuesday, March 22, 2011

    Getting Started

    This is my first attempt at blogging, but I am excited!  My goal is to share my design and remodel projects in hopes of inspiring confidence in others.

    I believe your home should reflect your personality - and I'm always interested in a challenge.

    I find great satisfaction in adding value to my home with little more than an idea and the confidence that I'll figure the details out along the way.  So far, I've not screwed anything up!

    I hope you'll find my posts useful, and that we can work together on many projects in the future.

    Here we go!